 License:PA072883


Drip Edge: What It Is, Why Code Requires It,
and Whether Your Roofer Is Installing It Correctly
Drip edge is one of the cheapest parts of a new roof and one of the most commonly skipped. It's a thin strip of bent metal along the edges of your roof, and most homeowners never notice it. But when it's missing or installed wrong, the damage shows up slowly in rotted fascia boards, stained siding, soggy roof decking, and gutters that pull away from the house.
If you're getting a roof replaced this fall, or you're trying to figure out why the trim along your eaves keeps rotting, this guide explains what drip edge does, what the building code says about it, and how to tell whether your roofer did it right.
What Is Drip Edge?
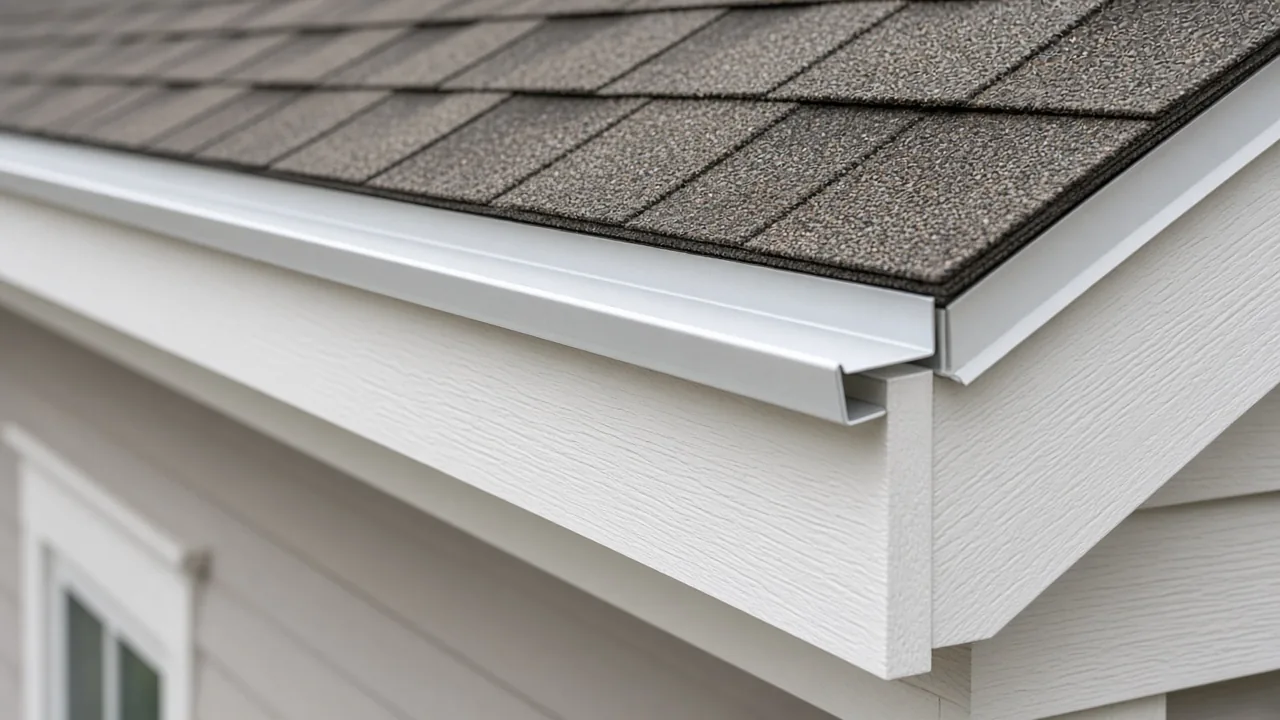
Drip edge is a piece of formed metal installed along the edges of a roof. It covers the very edge of the roof decking and bends outward, so water running off the shingles drips clear of the fascia and into the gutter instead of curling back underneath.
It's usually made from aluminum or galvanized steel, with copper used on some higher-end and historic homes. It comes in a few common profiles:
- L-shaped (often called Type C): a simple 90-degree bend, common on older installations
- T-shaped (often called Type D): has a small outward lip that kicks water farther from the fascia
- Gutter apron: a longer flange designed to direct water into the gutter along the eaves
Different profiles can be used on different edges of the same roof. What matters most is that the profile fits the edge and that it's installed in the right order with the underlayment.
What Drip Edge Actually Does
A roof edge without drip edge relies on the shingles alone to shed water. That works for a while, but water has a habit of following surfaces. Without a drip edge, it can wick back under the shingle edge and soak into the decking and fascia. Drip edge helps by:
- Protecting the edge of the roof deck from rain and melting snow
- Keeping water off the fascia board, which is where a lot of eave rot starts
- Directing runoff into the gutter instead of behind it
- Supporting the shingle edge so it doesn't sag or curl over time
- Closing the gap between the decking and fascia, which keeps out insects and small animals
- Helping the roof edge resist wind, since a secured metal edge is harder for wind to get under
In our part of Pennsylvania, freeze-thaw cycles make that last mile of the roof even more important. When ice dams form along the eaves, meltwater backs up right at the edge. A properly installed drip edge, combined with ice-and-water shield, gives that water a much harder time getting into the structure. We explain more about that in our post on the signs and solutions to ice damming.
What a Correct Drip Edge Installation Looks Like
The code spells out several specifics for drip edge on shingle roofs. In plain language, it calls for:
- Drip edge at both the eaves and the rakes. Eaves are the bottom horizontal edges where gutters hang. Rakes are the sloped edges on the gable ends.
- Overlapped joints. Where two pieces meet, they should overlap by at least 2 inches.
- Proper coverage. The drip edge should extend at least 1/4 inch below the roof sheathing and at least 2 inches back onto the roof deck.
- Secure fastening. It should be mechanically fastened to the deck no more than 12 inches apart.
- Correct layering with underlayment. Along the eaves, the underlayment goes over the drip edge. Along the rakes, the underlayment goes under the drip edge.
That last point is where a lot of installs go wrong. The layering order matters because of how water travels. At the eaves, you want water on top of the underlayment to flow onto the drip edge and into the gutter, so the underlayment laps over the metal. At the rakes, wind-driven rain can push sideways, so the metal laps over the underlayment to keep water from getting underneath it.
Your shingle manufacturer's installation instructions also matter. As a certified Owens Corning Preferred Contractor, we follow the manufacturer's specifications on every installation, including how far the shingles overhang the drip edge.
Signs Your Drip Edge Is Missing or Installed Wrong
You can spot a lot from the ground. Look for these warning signs:
- Rotted or soft fascia boards, especially behind the gutters
- Peeling paint or dark water stains on the fascia or trim
- Water dripping behind the gutter instead of into it during rain
- Gutters pulling away from the house
- Shingle edges that sag or curl over the edge of the roof
- No visible metal edge when you look closely at the roofline
- Wasp nests or critter activity at the roof edge, which can mean there's an open gap
- Water stains on the ceiling near exterior walls, which can point to edge leaks
If you see one or two of these, it doesn't automatically mean the drip edge is the culprit. Flashing, clogged gutters, and ventilation issues can cause similar symptoms. That's why an inspection is the best next step.
Common Drip Edge Mistakes We See
After decades of roofing in this area, these are the issues that come up most often:
- Skipping it entirely, especially on older re-roofs or layovers
- Installing it only on the eaves and leaving the rakes bare
- Getting the underlayment order backwards at the eaves or rakes
- Too few fasteners, which lets the metal loosen and lift in wind
- Leaving gaps at joints and corners instead of overlapping and folding them properly
- Mixing incompatible metals, like fastening aluminum drip edge with the wrong fasteners or pairing it against copper, which can cause corrosion
- Not coordinating with the gutters, so water still ends up behind the gutter line
That last one is a big deal. Our gutter crews make sure gutters are tucked correctly under the drip edge so water lands in the gutter and not on the wood behind it.
Can You Add Drip Edge to an Existing Roof?
Sometimes. It's possible to slide drip edge under the first course of shingles on an existing roof, but it's tricky. The shingles have to be lifted without cracking them, the underlayment order at the eaves is hard to get right without removing material, and older shingles can be brittle. On some roofs it makes sense as part of a targeted roof repair, especially if fascia or edge decking is being fixed at the same time.
On other roofs, especially ones nearing the end of their life, the better move is to wait and do it right during a replacement. We'll tell you which situation you're in. We lean toward repairs whenever a repair is the honest answer, and we won't recommend a full replacement your roof doesn't need.
Should Drip Edge Be on Your Roofing Estimate?
Yes. On a replacement, drip edge should be listed on the estimate, usually measured in linear feet. If it's missing, ask about it. Every roof replacement we do includes drip edge at the rakes and eaves, along with ice-and-water shield at the eaves and valleys, synthetic underlayment across the field, and custom-formed flashing at every penetration.
If you want to see how drip edge fits with everything else on a new roof, our guide to what is included in a roof replacement breaks down each component.
When Edge Damage Turns Into an Emergency
A missing drip edge usually causes slow damage, but a storm can turn a weak roof edge into an active leak fast. If wind peels back the edge of your roof or water is coming inside, we offer around-the-clock emergency home repairs, including tarping to stop water intrusion until a permanent fix is scheduled.
Have Your Roof Edges Checked Before Winter
Fall is the right time to look at your roof edges. Once the first freeze hits, any weak spot along the eaves gets tested by ice and snowmelt. RAM Roofing & Exteriors offers complimentary roof inspections with detailed written estimates, and we'll show you labeled photos of your drip edge, fascia, and gutters so you can see exactly what's going on.
We're fully licensed and insured in Pennsylvania and New Jersey (PA072883 and NJ 13VH11020800), and homeowners trust us with a 4.9-star Google rating from 200+ reviews. Have more questions first? Our FAQ covers permits, timelines, and what to ask before hiring a roofer.
Call (215) 315-7700 to schedule your inspection.